Basically, most of times, you can achieve the custom post types functionality using regular posts and categories. However, it is much harder for a non-techie user, such our clients, to create a post, assign it to the right category and make sure it won’t screw other thinks up.
While the possibilities of using custom post types are limitless, for the sake of simplicity, I will use as example a simple investment website, which will feature a title, description and a thumbnail with a property.
Register and calling the custom post type
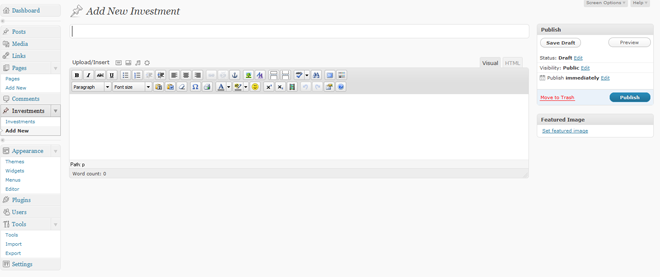
First, I want to exemplify how the back-end of our custom post type will look like. As you can see, the interface is simplified and contains only the necessary editing areas.

Register the custom post type
In the functions.php file from the active theme directory, add the following code:
//-----------register custom post type
  register_post_type( 'investments',
    array(
      'labels' => array(
        'name' => __( 'Investments' ), //this name will be used when will will call the investments in our theme
        'singular_name' => __( 'Investment' ),
		'add_new' => _x('Add New', 'investment'),
		'add_new_item' => __('Add New Investment'), //custom name to show up instead of Add New Post. Same for the following
		'edit_item' => __('Edit Investment'),
		'new_item' => __('New Investment'),
		'view_item' => __('View Investment'),
      ),
      'public' => true,
	  'show_ui' => true,
	  'hierarchical' => false, //it means we cannot have parent and sub pages
	  'capability_type' => 'post', //will act like a normal post
	  'rewrite' => 'investment', //this is used for rewriting the permalinks
	  'query_var' => false,
	  'supports' => array( 'title',	'editor', 'thumbnail', 'excerpts', 'revisions') //the editing regions that will support
    )
  );
For more information regarding register_post_type please visit the official codex documentation: http://codex.wordpress.org/Function_Reference/register_post_type.
At this point, you can go ahead in back-end and add a new investment, which will show up next in our site, after we do the following step.
Creating and calling the custom post type in our template
Next, we will create a file called investments.php and add the following code to it:
<div class="invest_thumb">
<?php
if ( has_post_thumbnail() ) { ?> <?php } else { ?> <a href="<?php the_permalink() ?>"><img alt=" " src="<?php bloginfo('template_directory') ?>/i/post-no-img.png" /></a> <?php }
?></div>
As you can see at the top, we specified to this page a special template name. In back-end, we have to create a page, which we can be named investments (or any other name), than assign it our newly created template. This page, will display our investments and now we can organize our general navigation easily.

We specified that our custom post type should behave like a post, which means we can have single post view. We can do that by duplicating our investments.php file and name it: investments-single.php. For this file we don’t need anymore the template name anymore at the top, so make sure you remove that part, so we don’t mess up the first template.
Custom post thumbnails in edit post / custom type overview
Starting with WordPress 2.9, we have the ability to easily attach to any post or page a featured image. Our purpose is to show up a preview of this thumbnails in our investments back-end overview.
In functions.php file add the following code:
//ENABLE POST THUMBNAILS FOR ALL POSTS AND PAGES
add_theme_support( 'post-thumbnails');
set_post_thumbnail_size( 200, 125, true ); // hard crop mode true
//------enable post thumbnail preview for custom columns
if ( !function_exists('fb_AddThumbColumn') && function_exists('add_theme_support') ) {
	// for post and investments
	function fb_AddThumbColumn($cols) {
		$cols['thumbnail'] = __('Thumbnail');
		return $cols;
	}
	function fb_AddThumbValue($column_name, $post_id) {
			$width = (int) 200;
			$height = (int) 125;
			if ( 'thumbnail' == $column_name ) {
				// thumbnail of WP 2.9
				$thumbnail_id = get_post_meta( $post_id, '_thumbnail_id', true );
				// image from gallery
				$attachments = get_children( array('post_parent' => $post_id, 'post_type' => 'attachment', 'post_mime_type' => 'image') );
				if ($thumbnail_id)
					$thumb = wp_get_attachment_image( $thumbnail_id, array($width, $height), true );
				elseif ($attachments) {
					foreach ( $attachments as $attachment_id => $attachment ) {
						$thumb = wp_get_attachment_image( $attachment_id, array($width, $height), true );
					}
				}
					if ( isset($thumb) && $thumb ) {
						echo $thumb;
					} else {
						echo __('None');
					}
			}
	}
	// for posts
	add_filter( 'manage_posts_columns', 'fb_AddThumbColumn' );
	add_action( 'manage_posts_custom_column', 'fb_AddThumbValue', 10, 2 );
	// for investments
	add_filter( 'manage_investments_columns', 'fb_AddThumbColumn' );
	add_action( 'manage_investments_custom_column', 'fb_AddThumbValue', 10, 2 );
}
Custom back-end columns overview
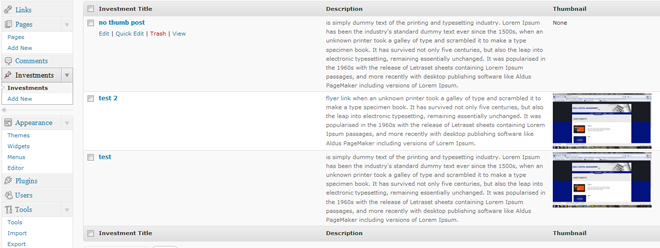
By default, any WordPress post or page will display the title, author, categories, date which is not relevant to our investment page, where we want to display only title, description and the investment thumbnail, like in following image:

The only left thing to do, is to add in functions.php file the next code:
//----------------edit custom columns display for back-end
add_action("manage_posts_custom_column", "my_custom_columns");
add_filter("manage_edit-investments_columns", "my_investments_columns");
function my_investments_columns($columns) //this function display the columns headings
{
$columns = array(
"cb" => "<input type="checkbox" />",
"title" => "Investment Title",
"description" => "Description",
"thumbnail" => "Thumbnail"
);
return $columns;
}
function my_custom_columns($column)
{
global $post;
if ("ID" == $column) echo $post->ID; //displays title
elseif ("description" == $column) echo $post->post_content; //displays the content excerpt
elseif ("thumbnail" == $column) echo $post->post_thumbnail; //shows up our post thumbnail that we previously created.
}
Resources
Custom columns:
http://kovshenin.com/archives/custom-post-types-in-wordpress-3-0/
Post thumbnail post and page overview:
http://wpengineer.com/1960/display-post-thumbnail-post-page-overview/
Conclusion
Using custom post types we can provide easy to use content management systems, yet powerful and flexible.
Going the extra mile and customize the WordPress back-end, it makes a difference between good developers and great developers, while our clients can enjoy their polished and simple to use websites.

Thanks for the info.
Update for WordPress 3.0:
Just add the following line to functions.php
add_theme_support( ‘post-thumbnails’ );
Then, you don’t need the two functions to enable thumbnail support – it will automatically be supported.
Then, do the following
function my_custom_columns($column)
{
global $post;
if (“ID” == $column) echo $post->ID; //displays title
elseif (“description” == $column) echo $post->post_content; //displays the content excerpt
elseif (“thumbnail” == $column) the_post_thumbnail(); //shows up our post thumbnail that we previously created.
}
Is there a way to specify the width of the custom columns in the Edit backend? Other than through the CSS, I mean?
CSS is a good solution for that and it should work well.
I have a strange issue. The column pulls the thumbnail, but it pulls the same exact photo for every post… I haven’t modified your code in any way, and even in your example its the same thumbnail for both posts. Why is that?
Freddie, you need to assign the featured image for each post, if not, a default one will be loaded.
In my demo I uploaded the same for each post.
When you edit a post, you have under publish section, on the right, “Set Featured Image”.
How would you display data from a custom meta box?
Thanks for the post. This has been a great help in devoping a CMS for my church using wordpress.
I am having a issue with my permalinks. My blog url shows up twice in the permalink.
For example…a page is http://tlcjenera.org/http:/tlcjenera.org/investments/blah
I am using a custom permalink structure as /http:/tlcjenera.org/%postname%
Any ideas on why this is?
Thanks,
I will Tweet you blog as a thankyou!
Scott
Try: %postname%/
or %category%/%postname%/ without the link in the front.
@Scott: i would also recommend either %postname%/ or %year%/%postname%/
I had %category%/%postname%/ on my blogs until i read an article on yoast or a similar site that showed that the %category%/%postname%/ permalink structure is not favorable.
Of course this depends on what you are trying to accomplish and you should choose what fits the needs of your church best. 🙂
Anyway i second Lucian’s recommendation and if you implement it your problem will be gone!
It’s good to note that you can’t change the columns of a post type that’s set to “Page” or has “hierarchical => true”.
Thanks for this post, it was almost everything I was looking for. Can anyone help me with creating a custom post type that allows the uploading of two images (before pic, after pic) and then displays these images side by side on a page?
The part I am having trouble with is adding the two image upload areas and how that is designated in the custom post type.
I am relatively new to WP and any help would be appreciated.
WordPress 3.1 (I’m currently using the beta) brings with it sortable columns.
The following post shows you how to make your custom columns sortable.
http://scribu.net/wordpress/custom-sortable-columns.html
thanks for this tut, 🙂